Betonamit has been used safely and with great results by thousands of contractors and homeowners all over the world. Safe use depends on following instructions and wearing safety goggles at all times. Although non-toxic, Betonamit is caustic, and can cause severe eye injury if splashed into eyes while mixing or pouring.
Also, the chemical reaction of Betonamit and water generates heat. If this reaction goes too quickly, the temperature can go above the boiling point of water before all the water has chemically combined with the Betonamit. This can result in a steam-driven explosion which blows the Betonamit from the hole with sudden force.
To avoid blowouts, follow the instructions regarding mix water temperatures and hole sizes, as told later in the manual. Always wear safety goggles , and never use drill holes larger than 1-1/2" diameter. Blow dust out of the holes after drilling, and keep Betonamit cool before use.
1. Holes must be drilled so as to allow a free face for the Betonamit to push toward. For example, drilling at 45° angle in a flat surface of ledge will push it upwards, but drilling straight down might not allow anywhere for the pressure to go.
2. To demolish a slab without pushing out the walls which surround it, drill a cone shaped pattern at the center and fill these holes first. The cone will pop upwards and create a free face.
3. Hole pattern depends on tensile strength of what you're breaking, amount of rebar if any, and the size of the pieces you want when you're done. This can often be determined by experiment; a good starting point is to space holes one foot on center in rows one and a half feet on center. In non-reinforced concrete, holes may be spaced as far apart as 24".
4. Hole pattern also depends on how fast you need results. More holes spaced closer together will have faster break times and smaller pieces, but this costs more in labor and Betonamit.
5. Boulders are much easier to break than reinforced concrete or ledge, and drill holes can be spaced further apart, especially if breaking speed is not critical.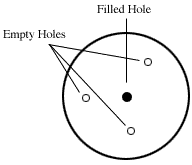
6. When removing part of a slab, you will want to prevent cracks from spreading into the rest of the slab. Drill holes 6" on center in a line between the "demolish" section and the "keep" section, then fill every third hole. The empty holes form weak points and prevent cracks from spreading into the "keep" section.
7. Empty holes can also be used to direct cracks -they cost less than filled holes. For example, if you want to break a boulder into thirds, you can use this pattern:
This will save money campared to filling all the holes, but will slow down the breaking time.
| Rock or Concrete Temp | Water Temp(F) | Hole Size |
| 25 to 40°F | 110°F max | 1-1/2" dia. |
| 41 to 57°F | 85°F max | 1-1/2" or 1-3/8" dia. |
| 58 to 72°F | 65°F max |
1-1/4", 1-3/8", or 1-1/2" dia. |
| 73 to 80°F | 40°F max.(iced) | 1-1/4" or 1-3/8" dia. |
| 81 to 95°F | 33°F max.(iced) | 1-1/4" dia. |
| When rock or concrete is above 73°F, add 5 ounces of extra water per 5 kilo container, 33°F (iced). Halve this amount when using Type S in 2-1/2 kilo containers. Over 95°F cool holes with cold water, then blow out before installing Betonamit. |
Notes:
1. Hole temperature can often be reduced by waiting until late night or early morning.
2. When rock or concrete is above 65°F, keep the Betonamit as cool as possible before use.
3. When rock or concrete is above 85°F, store Betonamit in a cooler with ice or in a refrigerator before use.
4. When rock or concrete is above 73°F, do not mix more than one 5 kilo container at a time.
5. Measure the rock or concrete temperature - DON'T GUESS! Tie a string onto the thermometer and lower it into the drill hole.
Mixing Type-R | Mixing Type-S | Notes | Blowout Causes | Checklist | Conversions | Material Safety Data
(603) 323-2323 | Fax (603) 323-2322 | minus320@ncia.net